

.svg)

.svg)

*Rhodium floors always advise getting a licensed and bonded professional installer. Check the following link to know more: https://rhodiumfloors.com/custom-flooring-installation-instructions/
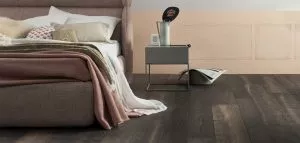
You’ve decided to invest in beautiful, durable flooring materials, so you need to know how to lay a hardwood floor.
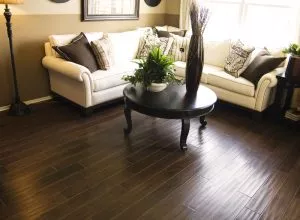
The quality and visual pleasure of wood flooring are unquestionable. Sadly, some efforts to install hardwood floors are the opposite: very questionable!
It’s not just about maximizing the benefits of this durable flooring material. It’s about creating a flawless finish in your room. A finish that stands the test of time and takes a hammering from foot traffic, spills and furniture legs.
It’s not something that can be rushed or attempted half-heartedly. It requires planning and preparation. Then, you need the right tools and techniques for the job.
If you take your time and use quality materials, it’s possible for any homeowner to lay hardwood flooring successfully.
The starting point
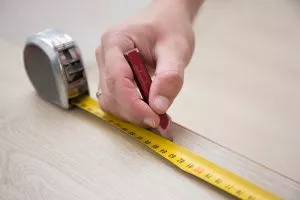
The first thing to do is meticulously measure your room.
Hardwood flooring is usually supplied in longboards. The formula for ordering boards is multiplying the length and width of the room. This gives you a square meter sum for the entire surface.
Then, calculate the number of square feet of boards you need. Round up to the nearest half meter when measuring your room.
Knowing how to lay a hardwood floor means a good relationship with your supplier. They can tell how many square feet are in each pack of boards and what you need. Order sufficient boxes plus about 10% extra.
This gives you wiggle room if you run into problems when installing your hardwood flooring. It also allows for cutting waste.
The same measurement can also tell you about how much underlay to buy. The type and depth of specialist underlay depend on the category of hardwood flooring you are using. It also varies according to the purpose of the room you are flooring. Some places may need a damp-proof membrane too. This is a moisture barrier for your hardwood flooring.
The next decision is whether it is possible to lay the hardwood flooring with no skirting boards or baseboards in place. Doing the floor before installing these, or with them removed, gets the best result. The cut edges of your hardwood floor can then be covered over.
If skirting and baseboards must stay in place, it is best to buy and fit a floor trim. This will neaten your edges.
How hardwood flooring is fixed
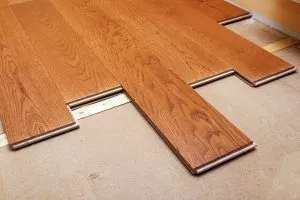
Most hardwood flooring boards are fitted together and fixed in place using tongue and groove. This means the boards slot together neatly.
There are some variations that use adhesives, nails, and clips to hold the boards in place, but they still use tongue and groove placement.
Working out how to lay a hardwood floor requires clear instructions from your supplier. Check what additional equipment and components are needed to fix the hardwood boards in place.
More preparation tips
When considering how to lay a hardwood floor, your room needs to be thoroughly reviewed and prepared. Are you going to need to trim baseboards and doors, for example, to slot boards beneath them?
Is your surface clean and smooth? Are there any squeaks in the sub-flooring that you need to deal with?
Cover the floor with an appropriate specialist underlay. Then you are ready to start.
How to begin work
The next step is to start placing your boards. You need to begin with one wall to line up your placement. Usually, the best bet is to start with the wall that has the room entrance in it.
The direction your flooring goes is entirely a matter of personal choice. Some people choose to lay boards pointing from the entrance into the room. Or, from the front of the house to the back.
It’s worth pointing out that your boards do all have to all go in the same direction! Being a bit of a maverick will result in disaster and ripping it up to start again.
When laying the first board, place the tongue side against the wall. It is recommended to place 12mm spacers between this and the wall. This provides an expansion gap for when all boards are slotted in place.
Take the next board and connect the two short ends together, to run alongside the wall.
Pushing down each connection usually works, but you may also need to give a gentle tap.
Over doorways, place spacers either side of the opening.
Once you have completed the entire run of the wall, measure the space left and trim a board to fit. Remember to include an allowance for the spacer in your calculations.
Covering the entire floor
From this start, you should now know how to lay hardwood flooring across the entire space.
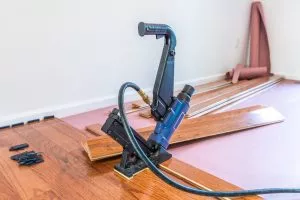
It is simply a matter of carefully running and connecting the boards. Use any fixing systems that were recommended by your supplier in a consistent fashion.
With each line of boards, use a knocking block and a hammer to tap them into a snug fit. This is done before laying the next line or individual board.
One of the most common questions when installing a hardwood flooring is: What is the best way to cut your boards effectively and to size? A jigsaw is ideal as it can ensure precision cutting.
Also, when you get to the final board in each run, getting that in place can be tricky. It is recommended to hook a pull bar over it, to lay it down. Then tap it into place to create tight joints along the line.
Using your careful measurements from the preparation stage, take care around doorways. This is a tricky bit as you need to slot the boards neatly under the baseboards.
If there are pipes and radiator fixings to take into account, measure the size of the gap and the distance from the wall. Then trim your boards and drill a hole to fit tightly around these fixtures. This may mean cutting out a piece of board, to slide it around the pipe. Use adhesive to neatly add the cut piece back in, behind the pipe.
The final run of hardwood flooring in your room will need to be trimmed down to fit in whatever space is left. Remember to leave a 12mm expansion allowance for your spacing against the final wall.
A pull bar is handy to fit this final row in place.
Last stages
Having successfully mastered how to lay hardwood flooring, you are ready to finish off. Remove your spacers. Then fit any trim required. Or, replace skirting boards and baseboards if they were not in place.
Check if you need to trim doors more, before reinstalling them.
Using this guide on how to lay a hardwood floor still relies on choosing good quality materials. If you start with components that “cut corners” then your flawless finish may elude you. Or your fabulous even flooring will start to warp and crack.
To learn more about how to lay hardwood flooring that’s beautiful and built to last, contact us. Rhodium Floors offers the best materials at a great price. Call us at 1 (323) 306-9999 to know more.
.svg)

